Showing posts with label DIY Projects. Show all posts

Sunday, August 5, 2012

DIY Branch Jewelry Hanger

As my jewelry collection continues to grow I am always looking for new ways to store my it. I'm a very visual person so I like to have it all laid out and 90% of the time that means tangled in a pile on my dresser. So the other day when I was in a rush out the door, desperately trying to untangle a necklace I realized I couldn't continue to keep my jewelry this way. I needed a way to get organized and fast. So off to the internet I went! I found tons of cute storage pieces and while I didn't necessarily have a specific thing I wanted in mind, I just knew I wanted something to hang on my wall. And as I continued to look I realized that most of the stuff I was looking at I could just make. So I decided to save my money and get to work making something myself to hold my jewelry.

What You'll Need:
Embroidery Thread
Scissors (helpful for pulling apart the jump rings)
Chain
Two Jump Rings
A Branch
Two Thumb Tacks


Step 1.
Loop the chain around the branch and close it together with the jump ring. Repeat on the other side. 


Step 2. 
Begin to decorate your branch with the thread using as much or as little as you like. 


I chose to do less as you can see below. 


Step 3. 
Admire your work, tack to your wall and then hang your necklaces and bracelets on it. 


Don't forget to comment with questions, suggestions or compliments!

Tuesday, July 31, 2012

DIY Decorated Box

While perusing Michaels, looking for inspiration for projects I came across these cute little one dollar wood boxes. I guess I should have started this post by saying I have a lot of little things, from earrings to buttons to unidentifiable little objects broken off from various things. And having so many little things makes it hard for me to keep organized therefore boxes tend to me my best friend. So I bought up a bunch of these little boxes took them home and began to decorate.

What You'll Need -
1. Wood Box
2. Primer
3. Paint
4. Printed Internet Images
5. Glue

Step 1 & 2-

Prime your box, wait for it to dry and then paint you box your desired color, may take a few coats (mine certainly did).


Step 3 -

Print out your image, cut them out, and then plan your arrangment on the lid before you glue.


Step 4 - 

Next you can either seal it by using glue over the top OR you can do what I did was coat it in metalic fabric paint. 


Step 5 -


Your done! And here is another box I painted just for kicks. Comment with any questions!

Saturday, July 28, 2012

How To Wear A Short Sleeve Button Up

On my post DIY Tank Sleeve Button Up I received a comment asking for some tips on how to style a sleeveless button up. (Sorry about the late reply!) So bellow are some tips on interesting ways to wear a sleeveless button up, I hope you find this helpful!

1. Front Knot
It is no secret that that showing just a little bit of skin either on your back or on your waist is a huge trend. Well you can accomplish this same look without spending 30 dollars or cutting a hole in your favorite t-shirt. Just take your button up, unbutton the last two buttons and just tie them in a knot raising the bottom of your shirt to rest around your belly button.


I paired this look with a pair of high waisted shorts, my favorite tan heals and (recognize the headband?) all together this makes for a 60's inspired look perfect for a casual day in the park. 

2. Tucked In
You can also always go the classic route and tuck it into a skirt, shorts, or a pair of jeans. This way is timeless and also key if you plan on wearing your button up for a work or formal occasion.


This outfit features one of my favorite skirts which, fun fact, was the skirt I had to wear for the brief time I went to a private school. I love this skirt, it can literally be worn with anything for pretty much any occasion. 

3.  Half Tucked In
This look is exactly what the title says, half tucked in and the other half not. In theory this might sound odd but trust me this look is killer.


4. Paired With A Bandage Skirt
This look is mainly used to showcase the classic untucked look which is always a timeless way to go. 


This look features one of my favorite skirts, a starry print bandage skirt from H&M and simple black boots from UrbanOG accessorized with handmade beaded jewelry. 


Friday, July 27, 2012

DIY Headband

Headbands are awesome. I love them and when I was sorting through my hair accessories I found I had a surplus of plain headbands that I haven't worn, well probably since middle school. So instead of throwing them out I have come up with a plan to repurpose them.

What you will need:

1. A plain headband, cheap ones can be found CVS
2. Fabric
3. Glue
4. Any embellishments you wish to use, I will be using gold fabric paint.

Step 1.
Get out your glue and literally just attack your headband with it and then just stick it to the fabric.


Step 2.
Attack the inside of the headband with glue and then just begin to wrap the remainder of the fabric around glueing when nessecary. Tip, try and make it so that the edges are on the inside of the headband, you can trim the fabric if you need to.


Step 3.
Now you can either stop here OR you can choose to add some embellishments, because come on, who doesn't love embellishments?


Step 4.
I decided to just keep it simple and add some gold metallic dots with fabric paint all the way around the band.


And ta-da! You have a brand new headband to add to your collection!

Sunday, June 24, 2012

DIY Tank Sleeve Button Up

As you know I am a big fan of button ups but during the summer they can get a little hot, so solution?
Tank sleeve button ups!

I went to Goodwill the other day and found a button up with such a beautiful print on it. But the selves made it look to western for my taste so, here is my tutorial on how to cut off the sleeves cleanly, you know, so it looks like you bought it that way.

Step 1. Find a shirt.


2. Pick apart the seem at each sleeve. A small pair of scissors works perfectly, be careful not to rip the fabric. 


3. For good measure I suggest you run the very edge of the sleeve through the sewing machine or hand stitch it, to prevent fraying. 

4. You're done! And now you have a brand new summer shirt!


Tomorrow I will post pictures of my outfit pairings with this shirt, and if you end up doing this DIY please comment and post pictures, I would love to see how yours turns out!


Sunday, June 17, 2012

DIY Repainted Heels

So, I have this pair of plain white heels and I have grown bored with them and what better way to stop being bored with them than to paint them.

Step 1. Find a white pair of heels or shoes.

Step 2. Apply painters tape.

Step 3. Pick out two colors.
(For paint either use fabric paint, found at  Michaels or acrylic paint, brand called basics, also found at Michaels.)


Step 4. Paint. Starting with your first color.
(I chose beige (color 1) and red (color 2))


Step 5. Wait 15 minutes and then remove the painters tape. You want to be sure that your paint isn't runny so when you remove the tape the lines stay nice and crisp.


Step 6. WAIT AT LEAST 30 MINUTES! You may think that the paint is dry but wait anyway. the next step involves placing tape on top of were you have already painted and if it is not completely dry the tap will peal the paint off the surface and you will have a mess on your hands.

Step 7. Begin painting with color 2.


Step 8. Once you have finished with color two remove all the tape and go back around the shoe and correct any smudges or spots you might have missed.

Step 9. Repeat on the other shoe.

Step 10. Marvel at your new pair of shoes and find an amazing new outfit to pair them with!


Tuesday, June 12, 2012

DIY Short Pockects

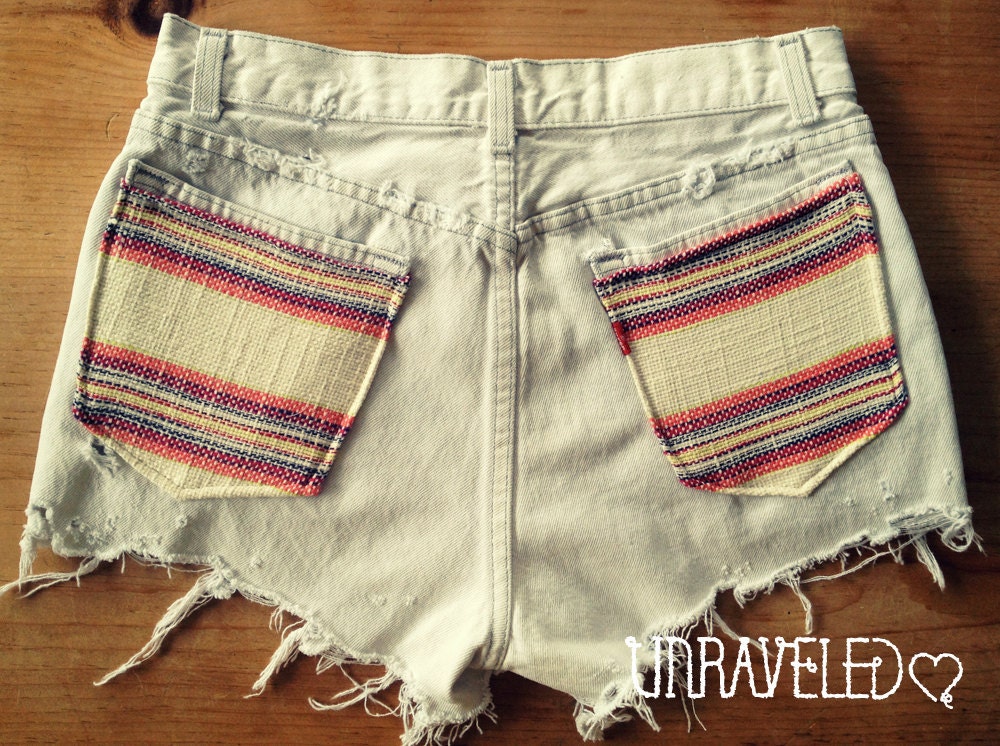
I got the idea for this tutorial while I was scrolling through Wanelo looking at all the pairs of shorts I couldn't afford. Like these (So cute!) ,

Unraveled -$80.00

Hooked yet? I am. And if I wasn't a poor college student I would buy these in a heartbeat but I am and I have resorted to making my own. 

Step 1. Goodwill**
Go to your local goodwill. If you like the cut off look I would suggest buying a pair of jeans and cutting them off yourself (this is what I will be doing so if you are not sure how to cut them correctly I'll show you). But, if you are just interested in decorating the pockets you can just buy normal shorts. 
This is the pair I found at Goodwill,

L.E.I. - $5.00


**This place is amazing you can find SUCH good pieces for so little! So go down to your local Goodwill and look around. A suggestion to keep in mind, don't go in there looking for anything to specific because odds are you won't find it and you will spend all your time looking for it and miss something great. So go there, find great pieces, and keep an open mind. 


Step 2. Finding a Good Fabric
Again, look around at goodwill and keep an open mind, you will know the right pattern when you see it. If you can't find what your are looking for at Goodwill, Hobby Lobby has an excellent fabric selection! And they always have a discount coupon or a sale so before you go check their website for coupons.
Here is the fabric I found at Goodwill,

$2.00
Step 3. Cutting your shorts.
The best way to get the length you want is to get a pair of your favorite shorts and use them as your measuring tool. 


You can do this by matching up the inseam of your jeans to your shorts. 

Then, with a rulers assistance, use a piece of chalk or a pencil to mark where you want your shorts to end. 


Next, take a good sharp pair of scissors and cut along the lines you have drawn, making them as straight and even as possible. 


Don't worry about the chalk lines, they will wash off easily. 

Step 4. Pinning the fabric.
Getting the fabric to the exact size is very important. 


Step 5.
Just outline the edges with the sewing machine and repeat on the other side and you are finished!


Saturday, June 9, 2012

DIY Hair Clips

While in Anthropologie drooling over all the cute clothes that I can only dream of affording I stumbled upon these beautiful hair clips.


I fell in love. And as I looked at it a thought popped into my mind. Hey. I bet I could make this. 

Step 1. Choosing Your Shape. 
I like the flower idea so after a bit of googling and tweaking on paint I found myself the perfect template. 


If this isn't the template you want to use they are easy to find, just type in flower (or any other shape) template into google.

Step 2.  Fabric.
Find a good fabric, the thicker the better.  


($2.50 at Goodwill)

Step 3. Trace the template onto your piece of fabric.


And then cut your flower out.


Make sure to leave a little bit on the top. 


To make things easier use the little piece you left on the top to clip onto something like a clipboard or a book.

(Read Around the World in Eighty Days by the way)

Step 3. Decorate the Fabric.
Pick out some pretty beads and decide if you want enough to cover every inch of the fabric or leave some exposed. I plan on covering every inch. 
(You can buy beads at Michael's or online at Fusionbeads)

Now, you can use simple sewing thread to sew the beads onto the fabric but I would suggest (and what I will be using) is FireLine size 0.006 which can be bought at Michael's. 

Thread a needle and make sure the needle is small enough to fit through your smallest beads.

There are lots of ways to go about doing this so if you have figured out a way that works for you use it, but if you haven't I would suggest starting in the center and working your way out and around. 


The best way to do the petals is to outline them and then work inward. 


Step 4. Cutting off the extra fabric.

When you have finished beading the entire flower you can cut off the excess fabric at the top. 


Step 5. Clean up your hair clip. 

Looking at the back isn't very pretty so lets cover it up. Grab another piece of fabric, the same one you used before or a new one. This step it very important because not only does it cover the ugly back but it protects the thread from getting snagged and ripping which, if that happens, could destroy all of your work. 


Add a few dabs of super glue on the places were the thread begins for extra protection. 

Then thread your needle, this time with sewing thread and sew together the new piece of fabric with your beaded flower. Only make one stitch to start out with. 


Then cut out the new piece of fabric a little bigger than the beaded flower. (The single stitch holds the two pieces of fabric together so they don't slip and slide everywhere when you are cutting.)


Step 5. Sewing together.


Now begin hand sewing the two pieces together. 


When you're finished snip the ends and add a dab of glue to the knot.
(I used green thread for clarity but I would suggest using a color that blends in better with the fabric you choose.)

Step 6. Adding the clip.

Pick a clip that is the length of the template you used. Don't use a bobby pin! They aren't strong enough to hold the beads! Make sure that the clip is all metal and doesn't have anything already attached because the super glue won't stick to it. 


Apply a generous amount of glue to the clip. 


And stick the clip carefully on the fabric applying pressure for about a minute. 


Admire you work for a moment and then clip it into your hair! 


I hope you found this helpful!
Comment if you have any questions about the steps.